


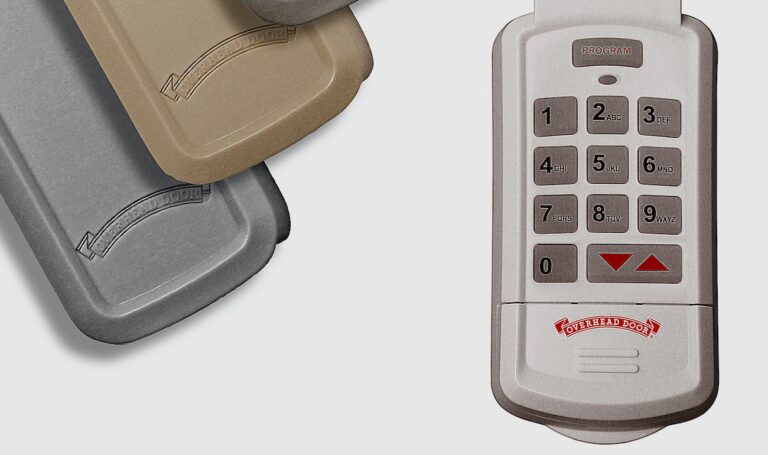
Wireless Keypad/Remote Programming Instructions
Overhead Door Company of Huntsville/North Alabama™
If you require further assistance with installation or programming your garage door opener or remote, don’t hesitate to reach out to our customer service team.
For help:
Call 1-800-929-3667
Wireless Keypad &
Remote Programming Instructions
Overhead Door Company of Huntsville/North Alabama™
Need help programming an Overhead Door™ garage door remote or wireless keypad? This page provides step-by-step programming information for Overhead Door™ Brand remotes and keypads, including our current and older models.
You will also find links to owner’s manuals for many current and discontinued Overhead Door™ garage door openers, so you can find the programming instructions for your specific model.
Programming Videos for Overhead Door™ Wireless Keypads
Prefer to watch the programming process?
Overhead Door™ provides instructional videos with step-by-step guidance for programming garage door wireless keypads. These videos can be helpful if you prefer to see the programming steps as you follow along.
View Overhead Door™ Programming Videos
Our commitment to excellence is evident not only in the superior quality of our garage doors and openers but also in our unmatched customer support. Embodying our motto, “The Genuine. The Original.”, we place a high priority on ensuring your complete satisfaction with our products and services.
For those looking to upgrade or replace their garage door keypad, we offer the latest Model OKP-BX, for purchase. Contact us for transparent pricing and expert guidance tailored to your needs. Connect with us today to explore your options.
Call Now

Don’t Want to Program It Yourself? We’re Happy to Help.
We understand that not everyone wants to climb a ladder, locate programming buttons, determine which model they have, or work through programming instructions.
If you would rather have someone handle it for you, Overhead Door Company of Huntsville/North Alabama™ can help with programming your garage door remote or wireless keypad.
Our team can also help troubleshoot an existing remote or keypad or determine whether replacement may be needed.
For service in Huntsville, Madison, Athens, Decatur, and surrounding metro areas, give us a call. We provide free pricing right over the phone, so you’ll know what to expect before scheduling.
Call 256-772-3674
Overhead Door™ Customer Support
For additional assistance with Overhead Door™ Brand products and programming, you may also contact Overhead Door™ Customer Support:
Call 1-800-929-3667
Call Now
Customer Service Department
Overhead Door™ Brand Keypads
Call – 1-800-784-5028
How to Program an
Overhead Door™ Garage Door Remote
Need to program your garage door keypad?
Skip this section and scroll down to the
Keypad Programming instructions below. ↓↓
Programming an Overhead Door™ garage door remote is usually a simple process, but the exact steps can vary depending on the age and model of your garage door opener.
If you have a new remote, replaced a lost remote, changed the battery, or have a remote that no longer operates your garage door, programming may be all that is needed.
Before you begin, make sure the remote has a fresh battery and is compatible with your garage door opener. If possible, locate the model number on your opener. You may need it if the general programming instructions below do not work.
How to Program an Overhead Door™ Remote With a Learn Code Button
If your Overhead Door™ garage door opener has a Learn Code button:
- Locate the Learn Code button. You should also see an indicator light near the button.
- Press and release the Learn Code button. Do not hold it down.
- Watch the indicator light. It should begin blinking. Your opener is now ready to learn the remote.
- Press the button on your remote that you want to use to operate the garage door.
- Depending on your opener and remote, you may need to press the remote button again to complete programming.
- Step clear of the garage door and test the remote. The door should now operate.
Programming Newer Overhead Door™ Garage Door Openers
Newer Overhead Door™ garage door openers, including many Legacy®, Odyssey® and Destiny® models, may use Program/Set controls instead of the older Learn Code button.
These openers use a programming menu and indicator lights to guide you through the process. Because the exact programming sequence varies by opener and remote, use the owner’s manual for your specific model if the instructions above do not apply.
Important: Do Not Accidentally Erase Your Remotes
Press and release the Learn Code button. Do not hold it down.
There is a difference between programming a remote and clearing the opener’s memory. Holding certain programming buttons for an extended period can erase previously programmed remotes and wireless devices.
If you are unsure which button to use or how long to press it, find your opener model below and refer to the owner’s manual before continuing.
Garage Door Remote Won’t Program?
If your Overhead Door™ garage door remote will not program, check a few simple things:
- Check the battery. Install a fresh battery and make sure it is installed correctly.
- Check compatibility. A remote that looks like your old remote is not necessarily compatible with your opener.
- Try again. Programming mode remains active for only a limited amount of time. If you wait too long, simply start over.
- Check your opener model. Different generations of Overhead Door™ openers use different programming procedures.
- Check for LED interference. If the remote works close to the garage but has poor range from the driveway, certain LED light bulbs can interfere with the remote signal.
If the remote still will not program, find your garage door opener model below and use the Overhead Door™ owner’s manual for your specific opener.
Find Your Overhead Door™ Garage Door Opener Model
Programming an Overhead Door™ remote depends on the model of garage door opener installed in your garage.
Select your garage door opener model below to access the appropriate Overhead Door™ owner’s manual, which includes the remote programming instructions for that model.
Current Models
Discontinued Models
For Wireless Keypad
Programming Instructions,
Please Choose Your
Overhead Door™ Brand Model Below
Wireless Keypad (Model OKP-BX) with CodeDodger®
To View Our Classic Overhead Door™ Wireless Keypad
Program Keypad for One Garage Door (CodeDodger 2)
Create Your Wireless Keypad PIN (Personal Identification Number)
On your wireless keypad:
- Press in order 3, 5, 7
- Press the PROGRAM key
- Enter your PIN (3 to 8 characters)
- Press the PROGRAM key again.
- Close keypad cover and wait 30 seconds
Program the keypad for a single door
On the power head: (Garage Door Opener)
- Press and hold the PROGRAM button until both LED lights turn BLUE
- Release button. Only the round LED will remain BLUE.
- Press and hold the PROGRAM button again then release. The Long LED will blink PURPLE
- Enter your PIN number using the keys on the keypad.
- Press the UP/DOWN button. LEDs will stay on solid.
- Press the UP/DOWN button again. LEDs will turn off.
- Press any key to stop opener. (It will automatically stop at the fully open or fully closed position.)
- The keypad backlight will turn off in approximately 30 seconds.
NOTE: If the door does not move, check the LED on the keypad. If the LED is blinking rapidly, the PIN was entered incorrectly. After the LED stops blinking, re-enter your PIN ad try again. Any keypad button will control the door for 30 seconds after the door starts moving. Rapid blinking of the red LED indicates an error. After a few seconds the LED will turn off. Start over.
More on How to Program Garage Door Openers
Proceed to the Mounting Instructions.
Program Keypad for Multiple Garage Doors (CodeDodger 2)
Create Your Wireless Keypad PIN (Personal Identification Number)
- Press in order 3, 5, 7
- Press the PROGRAM key
- Enter your PIN (3 to 8 characters)
- Press the PROGRAM key again.
- Close keypad cover and wait 30 seconds
Program The Keypad For Multiple Doors
All garage door openers will use the same PIN.
On the wireless keypad:
- Enter your PIN and press the PROGRAM button.
- Press the PROGRAM button again.
- Press the number of doors you wish to control (2 or 3)
- Press the program button again.
On your garage door opener power head: (Garage Door Opener)
- Select first opener and press and hold the PROGRAM/SET button until both LED lights turn BLUE.
- Release the button. Only the round LED will be BLUE.
- Press the UP/DOWN button again. LEDs will turn off.
- Press any key to stop opener. (It will automatically stop at the fully open or fully closed position.)
- The keypad backlight will turn off in approximately 30 seconds.
NOTE: If the door does not move, check the LED on the keypad. If the LED is blinking rapidly, the PIN was entered incorrectly. After the LED stops blinking, re-enter your PIN ad try again. Any keypad button will control the door for 30 seconds after the door starts moving. Rapid blinking of the red LED indicates an error. After a few seconds the LED will turn off. Start over.
More on How to Program Garage Door Openers
Proceed to the Mounting Instructions.
Mounting Instructions
The keypad must be mounted in sight of the door(s), at least 5 feet above the ground and clear of any moving door parts. Mounting screws are located inside the battery compartment.
- Remove batter cover and batteries
- Drill a 1/16″ pilot hold for the tip mounting screw.
- Install a screw into the drilled hole, leaving a 1/8″ gap between the screw head and the wall.
- Hook the keypad over the screw.
- Mark and drill pilot hole and fasten bottom screw.
- Install batteries and cover.
Additional Instructions
Change Your PIN
- Enter your current PIN and press the PROGRAM button
- Enter your NEW PIN and press the PROGRAM button.
Using a Temporary PIN
A temporary PIN allows temporary access to your home by repair persons, meter readers, etc.
- Enter your current PIN and press the PROGRAM button 3 times.
- Enter your temporary PIN and press the PROGRAM button.
NOTE: Do NOT reprogram the garage door opener(s). Temporary PIN remains active only until the next time your normal PIN is entered.
Forgot Your PIN (Resetting Wireless Keypad)
- Press and hold the PROGRAM button
- While holding the PROGRAM button, press and hold the UP/DOWN button for 5 seconds.
- Release both buttons. You must now start from the beginning and reprogram you wireless keypad.
Changing Battery
- If the keypad backlight does not come on, this indicates the need to replace the batteries.
- Press in on the front of the battery cover and slide it down off of the keypad.
- Remove used batteries and replace with “AAA” batteries.
- No programming is lost during replacement of batteries.
Wireless Keypad (Model OWK-BX)
The OWK-BX model has been replaced with the OKP-BX Model
Basic Instructions
Testing Garage Door Opener
- Enter your personal identification number (PIN).
- Press the button with the arrow up/down triangles.
Resetting/Clearing Keypad
- Press and hold the PROG button. Keep holding and proceed to step two.
- Press and hold the 6 button. Keep holding and proceed to step three.
- Press the key with the arrow up/down triangles.
Setting PIN On Keypad
- Press the following keys in order: 3, 5, 7, PROG (red LED blinks once per second).
- Enter your PIN (three to eight characters).
- Press the PROG key again (red LED blinks twice per second and turns off).
Getting Started
Before you begin, be aware of the following:
For convenience, program your keypad before mounting.If programming your garage door opener is disrupted at any point due to program failure, clear/reset your keypad. Then, start over. Locate the “Learn Code” button and the “Learn Code” red LED indicator.
Programming One Garage Door Opener
- Press the “Learn Code” button once (red LED indicator will blink).
- Enter your PIN.
- Press the button with the arrow up/down triangles. The “Learn Code” indicator LED will stay on.
- Press the button with the arrow up/down triangles a second time. The “Learn Code” indicator LED will turn off.
- Press the button with the arrow up/down triangles a third time. Garage door should now move.
Programming Two Or Three Garage Door Openers
All garage door openers will use the same PIN.
Programming The Wireless Keypad
- Enter your PIN and press the PROG button (red LED blinks once per second).
- Press the PROG button a second time (red LED blinks twice per second).
- Press the total number of doors you wish to control (either 2 or 3).
- Press the PROG button a third time (red LED blinks several times and turns off).
Programming Garage Door Opener
- Decide which door will be Door 1, 2 and 3. “Learn Code” indicator LED (on opener) blinks.
- Enter your PIN and press the arrow up/down triangle button. “Learn Code” indicator LED continues to blink.
- Press the number you have picked for this door opener: 1, 2 or 3. “Learn Code” indicator LED stays on.
- Press the arrow up/down triangle button a second time. “Learn Code” indicator LED turns off.
- Press the arrow up/down triangle button a third time. Garage door should move.
- Repeat steps one through five for programming each garage door opener. Each door opener must be programmed to receive the signal from the wireless keypad.
Troubleshooting Tips
- If the garage door does not move, check the red LED on the keypad.
- If the LED blinks rapidly, the PIN was entered incorrectly.
- Any keypad button will control the door for 30 seconds after the door starts moving.
- Rapid blinking of the LED indicates an error. After a few seconds, the LED will turn off, and you can retry.
- If the red LED does not blink during use, the battery needs to be changed.
Mounting Instructions
- Remove the battery cover.
- Drill a 1/16″ hole for the top mounting screw.
- Install a screw into the top drilled hole, leaving a 1/8″ gap between the screw head and the wall.
- Hook the keypad over the screw.
- Mark the bottom hole, then screw in the bottom screw.
- Reinstall the battery cover.